
 Building a magazine rack is a relatively easy project that even the beginning woodworker can complete in a weekend. It doesn’t require much material so you may even be able to make it out of the odds and ends lying around in your workshop.
Construction:
Tools required: sander, router
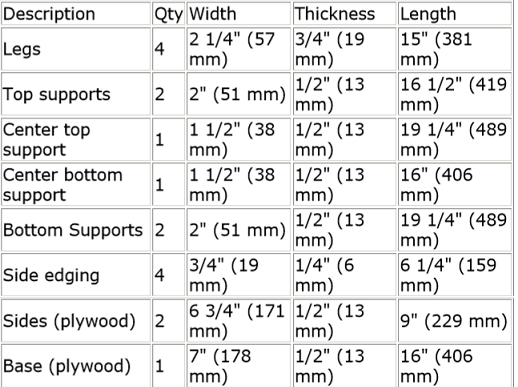
Lumber For The Project (Keep in mind I have visitors across the globe, so I included the metric system along with inches):
The best place to begin this project is with the four leg pieces. Take one of the four legs are make the following cuts with your router in it:
1. On the inside (3/4″) edge, make a rout that is 1/4″ deep and 1/2″ wide that runs from 1/2″ from the top of the leg to 2 1/2″ from the top. This rout should be 1/8″ in from each side. This slot will accommodate the top support that runs along the length of the rack.
2. On the same side as step one, make a rout that is 1/4″ deep and 1/2″ wide that runs from 4″ from the bottom of the leg to 6″ from the bottom. Again, this rout should be 1/8″ in from each side and it will accommodate the bottom support.
3. On the wide inside (2 1/4″) face, make a rout that is 1/2″ wide, 1/4″ deep and that runs from 4 3/4″ from the bottom to 13 3/4″ from the bottom. The rout should be 1/2″ in from the outside edge of the leg (i.e. the edge that did not have routs 1 and 2 put into them).
Once you have made all of these routs, square off the rounded corners so that the sides, bottom and top slot tightly into them. Sand the leg rounding off the edges to give a softer look to the project. Then, repeat the above steps for the other three legs.
Making the Routs
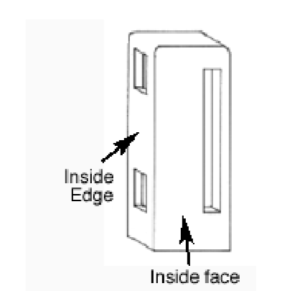
Before making the routs, make sure you have marked out the correct sides so that the inside edges all match up (i.e. face each other so that the top and bottom supports can be slotted in).
Next we need to make the slots in the bottom supports that will accommodate the base plywood. Cut a slot on the inside face (2″) that is 1/4″ deep and 1/2″ wide. This slot should begin 1/2″ from the lower edge and should be 16″ long (therefore it should begin 1 5/8″ from either end of the piece. Repeat this for the second of the bottom supports, squaring off the rounded ends of the slot to allow the base to fit in tightly.
Constructing the Sides
Now construct one side, gluing the bottom and top supports into two of the legs to build on complete side. Then construct the second side by repeating this step. Once the glue is dry, connect these front and back constructions to the plywood sides and the base, again gluing them together.
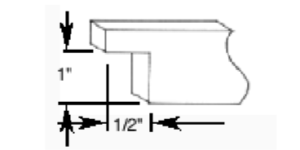 You now have the main shape of the magazine rack completed. Glue the thin side edging pieces to the top and bottom of the plywood sides, thus hiding the plywood’s edging. Now cut the center top support to the correct shape by cutting out a block from each end, as shown in this diagram.
Once cut to shape, sand the piece to round off the edges and then glue it on top of the two plywood sides, half way between the front and back.
Finally, sand off the center bottom support and then glue into place on the plywood base, again half way between the front and back support (and therefore matching the position of the top center support).
Give the entire unit a thorough sanding and then stain and wax.
NOTE: If you don’t have a router, you can still put together this piece using screws and putty for fill. Make sure you label the pieces and assemble according to the picture using butt joints.