In the wood shop, it’s hard to say which is most important: the work bench – or the table saw. Here’s a thought: Why not join them? Having a lonely old Delta saw that desperately needed table extensions, and no workbench whatever, joining the two at minimal cost seemed a great idea. This article describes the approach I used, in the hope that some of this info might help someone in a similar circumstance.

I highly recommend starting with a plan. Mistakes are likely at some point in a project, but making them on paper is painless and free, so every project in my shop starts here! In this case, as my little drawing shows, we’re extending the table on the left, adding one the same size on the right, and then adding support for a 27”x44” piece of granite I had left over from a kitchen counter remodel. The granite provides a stable, absolutely flat, hard, easily cleaned surface for support during cuts, layout, assembly and clamping. In all, the work surface goes from under two by three feet to nearly three feet by almost seven feet – with storage underneath. Yes indeed… that’s an improvement!
A lot has been written on work bench design, including that it’s best to use hardwoods; but that just wasn’t in my budget. For under $100, I got some premium Fir 2x4s, a couple redwood 4x4s, and a sheet of 3/8” plywood. Add to that some screws, glue, six bolts, and sweat, and we get a very workable product in short order, while making efficient use of floor space.

The basic table extensions are butcher-block style, glued up using 2×4 stock. Now 2x4s are milled with rounded corners so they’re user friendly in construction – fewer splinters from sharp edges! However, joining rounded boards would yield a roller-coaster table top… Yuk. So we trim about 1/8” from each end. The result is still plenty thick for stability, and a much flatter surface. Allow for the difference in dimension in your plans…

In work bench mode, I’ll be clamping and banging away with mallets and who knows what, so I want things to stay together – and stay put! In table saw mode, the surface needs to be flat and aligned for dependable cuts. Therefore, I’m not just relying on a glue joint for stability; I’m going to screw the individual planks to each other. Drilling through a top board ensures it will be pulled tightly against its mate. Alter the screw locations so they don’t stack up on each other – and remember to leave clearance for however your extension will attach to your saw. (More on that below.)

Another benefit of screwing the planks together is that assembly is quite straightforward; no need to wrestle with a number of boards, and clamps, and trying to keep everything aligned! And since we’re doing this on the floor (no workbench yet after all), every bit of “easier” is welcome…
An additional tip is to alter the grain from board to board so any flexion in one is countered in the next. Otherwise the whole assembly could simply warp, producing a surface that ultimately has either a bow or a hump, and neither is good.

In the end, a butcher block assembly winds up in the clamps overnight… but it didn’t take even 2 hours to get this far. Not a bad start.

I chose mortise & tenon joints for the legs for increased stability. An easy way to manage this is to cut the mortise using a large forstner bit. Since this leaves a rounded end on the mortise, use the protective cap for that same bit to outline the tenon profile. A little drilling, sawing, and some easy chiseling provide a healthy joint in short order.
Another thing shown in this image is the prep for attaching to the saw table itself. Bolts go through the end board, (at top in the image), into the cast iron saw table. I didn’t want any holes in the upper surface, so I cut reliefs on the bottom, again using the forstner bit, so my wrench would have clearance for about 40 degrees of movement. The notches allow installation of the bolts on the saw, and then the extension simply slides down onto them. A little tightening and we’re done!

Mortise & tenon joints also seemed the best way to manage lower leg bracing in order to keep everything strong and flush for the plywood shelving. Extra storage is a free byproduct of the basic table: you can build drawers, more than one shelf, or whatever you like; I’m going with a single open shelf.

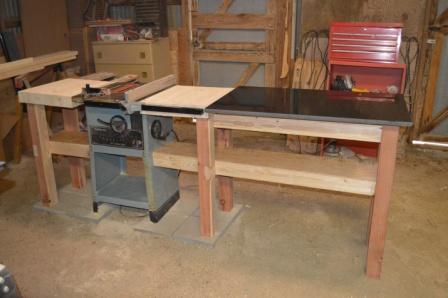
Putting those bits together, we’ve got a decent start! My shop is actually in the barn, which used to have stables, so the floor is dirt. I put both the saw and the new legs on patio pavers in order to provide a firm, stable platform.
On the right, looking at the back leg, you can see how the braces on that side are notched where they meet the legs. Then, as shown below, the extensions that come next are also notched so the two fit together in a strong joint that leaves a consistent plane for the plywood shelf.

A few more 2x4s and another set of legs give us a structure to hold the granite top. Now, taking the length times the height, at ¾” thickness, and the weight of granite per foot… carry the two… yeah… it’s heavy! Therefore the stock is set on edge so the weight has to either pull apart or compress the wood fibers. If the 2x4s had been laid face down, the weight could simply bend the fibers and the structure wouldn’t be anywhere near as strong.
You might also note that I have two layers of 2×4 on the top rails: the bottom set form the framework itself, and attach to the butcher block extension – a good sturdy anchor. On top of that is another 2×4, ripped to the width required to leave just ¾” for the thickness of the granite – so everything will be flush on top.

If you don’t have granite just lying around, don’t despair. You can use a plywood base and a top surface of any number of ceramic tiles that will be almost as stable, impervious to glues, and so on. Total square footage means you’re only looking at 10 tiles or so; it doesn’t need to break the bank.
In the end… viola! One very handy workbench with an integrated table saw – and storage underneath…

Not a bad little project – and a great improvement in capability!